|
by Gerald Warner,
Softball Pitching Instructor


We feel that the list
below is the best compilation of recommendations and potential
practices for a pitcher who wants to increase the speed of her
fastball.
However, all 20 of these techniques and drills will vary in
success from one pitcher to the next. All girls have strengths…and
limitations…based on genetics, physical characteristics, mental
attitude and personality, and
athletic
ability.
It also needs to be
stated here that increased pitching speed will not be a
cure-all. Speed alone
will not overwhelm or control good hitters. Well-developed additional
pitches are mandatory.
We have seen pitchers in high school and college with a
comparatively slow 53 or 55 mph fastball, but with an excellent
change-up, drop ball, rise, screw, or curve ball that makes them
very
successful.
Here are some
of the drills, refinements, and modifications that we encourage a
pitcher to use to increase her pitching speed. Typically, almost
any experienced pitcher can see a measurably faster fastball by
utilizing one or more of these
methods: 
1. Commitment and
effort – Somewhere during their young career, most
pitchers have heard a coach or a parent say “Just throw strikes”,
and unfortunately that statement continues to echo for a long
time. Accuracy for some pitchers has taken precedence,
deserved or not, over giving an all-out effort. Many pitchers
can increase speed when they truly commit to using good pitching
mechanics...and throwing hard. Be aggressive.
Think "Explode!". You have to EXPLODE
off the pitching rubber!
2. Improve your pre-pitching
warm-up – Even experienced pitchers feel they can
speed through their running and stretching regimen so they can get
right to throwing. Unfortunately, most do limited arm and leg
stretches, and perhaps most importantly, bypass good loosening up of
the midsection. The trunk (tummy and back) is the key to a
fast close and speed increase. Do opposite leg toe touches,
opposite leg touches on crunches and sitting hamstring
stretches.
3.
Stay loose! A LOOSE MUSCLE IS A FAST MUSCLE -
When thing start going wrong, step back and concentrate. Relax
your jaw, neck muscles, and upper back. Being too tight makes
you throw slower and lose control. A loose pitching arm allow
for a better whipping action and faster pitch.
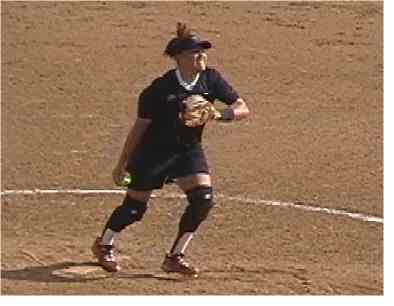
4.
Always
practice good fundamentals
-
The process of getting speed out of your pitch
starts with:
(1) a good full body lean (not bending at the waist) to (2) get a good
push off, and a
(3) long powerful
stride. (4) Open your body
fully during the rotation. Then,
(5) “close”
hard by bringing your shoulders back so you are (6)
tall and upright (not bending at
the waist OR leaning to the side) at the release of
the ball. At the release point, (7)
keep your arm straight (not bent
at the elbow) , and (8) for more power and control,
keep the fingers behind the
ball.
EXPERIENCED PITCHERS - There is
an additional article on this website that might be beneficial to
you.
Click here to go to For
Increased Speed and Accuracy - "Finish" the
Pitch
Here are some of these procedures in greater
detail:
5. Develop a strong
push off - The push off the pitching
rubber by your throwing-side leg can set in motion a critical
sequence of events that creates a faster pitch. As you
start your windup, you transfer weight from your rear leg to
your drive (or push-off) leg. A strong
push against the front edge of the rubber drives your stride leg
faster and farther, resulting in a more complete sideways twist
(or "opening") of your body at the middle part
of your arm rotation. A full 90-degree opening forces you to
more quickly torque your trunk "closed"... and a quick closing means
your shoulders close before your lower body, creating a strong arm
whip (see below) and likely a good wrist snap (see
#7).
To assist in getting a strong
push off, use a "body lean" weight transfer. As you start your
wind-up...as you start the forward rotation of your arm...let your
entire body (no bending at the waist)
lean or fall forward to transfer weight solidly to your push off
leg. This leaning concept increases weight on the drive foot,
making you to push off the rubber with greater
force.
6. Step on the "Power Line"
- Although some pitchers have been taught to
"sidestep" to complete the rotation of the trunk (closing), you
likely will gain speed by focusing all of your effort straight
ahead. The Power Line is an invisible line between the center
of the pitching rubber and the rear point of home plate. When
your stride foot lands with the toe touching against the Power Line,
you will likely improve your chances to increase speed as well as
control.
7. Arm whip
– Here is where we feel most pitchers have the greatest
opportunity to improve their pitching speed...and it is also
most often not mentioned. You can achieve a faster
fastball by speeding up the arm speed during the final downswing
before the release. This intentional “whipping” of the arm
through the final one-third of the rotation will create a
faster closing of the shoulder while the arm is still in its
downward movement, creating a faster movement of the arm (and subsequently the ball) just before the release
point, resulting in a much faster pitch. 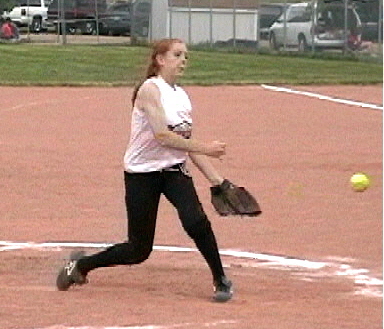
8. Come up tall at
the release
– We have seen many
pitchers,
particularly those without formal training, lose much
of their
potential speed by bending at the waist when they
release the ball.
Stay tall, and snap your shoulders back
when you deliver the pitch.
Kylee (shown in the
picture on the right) demonstrates good form at the
release of the pitch...upper body is nearly straight, no bending
at the waist, and her stride leg is pushing back to get maximum
resistance for the arm whip.
9.
Fingers behind the ball – This is such a fundamental
recommendation that it seems it doesn’t deserve mention here.
However, even some experienced pitchers were taught to release the
ball by rolling their fingers up the outside. Others use a
"twist release" somewhat similar to the release of
a screwball. A typical 3-finger fastball grip and
release forces a faster pitch by having the fingers “driving” the
ball through with power and speed. If the fingers are on the
side of the ball at the release point, speed will decrease.
10. Improve your
wrist snap - (This step is NOT
recommended for beginning pitchers or even those with 1 or 2 years
of experience. Concentrating on an intentional wrist
snap can adversely affect control, and even speed when attempted by
younger, less experienced pitchers).
A fast forward snap of the wrist as the
ball is being released , if done in conjunction with the arm whip
(#5 above), can increase pitching speed 3 to 5
miles per hour. To make it easier to create a good forward
snap at the release point, make it a practice to keep your wrist
bent backward slightly during the final downswing of your
arm. Precisely at the release point, consciously whip
your wrist forward to help accelerate the
ball. (Again,
this is recommended only for older, experienced
pitchers)
RECOMMENDED
PRACTICE ROUTINES & DRILLS:
11. Distance
pitching – This is the most effective drill to
increase your speed and control. AFTER you are well
warmed-up, step back one step (two or three
feet) after each pitch, throwing from a longer distance each
time. Work your way back until you can barely make the throw
to the catcher. Then start back forward, throwing from a step
closer each time. When back on the rubber, throw 15 to 20
consecutive full-speed fastballs. Do this distance-pitching
drill regularly…during every practice, and especially before a
game. BE CAREFUL! Pitching from a longer
distance, especially if done with the overweighted ball (see below), can lead to injury.
12. Weighted ball
– For strength and speed training, we often
recommend that a pitcher throw 15-20 pitches with an overweighted
ball each practice session. IMPORTANT: Improper warm-up,
over-use, or lack of caution when using a weighted ball, can cause
injuries. BE
CAREFUL!
You can buy regulation-size 12"
(circumference) softballs that weigh up to 12
ounces (twice the weight of a regulation 6¼+ ounce
softball) . Typically our pitchers use a 9, 10, or
11 ounce ball for strength development. Otherwise, you can
create your own 8 ounce weighted ball by adding 1½ to 2 ounces of
1½”-long finishing nails into the seams between the stitches. Pound
them into the ball along the seams every 2 to 3 stitches and
counter-sink each nail. (You might want to also dip
each nail in a small dab of glue first to help stop them from
partially coming back
out).
UNDERweighted
ball – Softballs that weigh
less than the standard ball are used for speed
training. Practice good pitching mechanics and
fundamentals using a 4 or 5 ounce ball, then move to an overweighted
8 or 9 ounce ball before moving back to the regulation
softball.
13. Increase your leg speed
with "Run-up / Walk-through" pitching – The speed of
your stride leg can determine the speed of your pitching. We
usually recommend that our pitchers use a 2-step approach by
starting 5 or 6 feet behind the rubber. Step first with your
left foot. The 2nd step lands on the front edge of the rubber
where you start your rotation and delivery. After releasing
the ball, continue "walking through the pitch" 1 or 2 steps
toward the catcher. Eventually you can increase the speed of
your approach by running to the pitching rubber. The faster
you drive your stride foot forward, the faster you will pitch. This
is especially beneficial when throwing your warm-up pitches at the
start of a new half-inning.
14. Bungee and harness
exercises – For a more explosive push off,
you can practice with a waist or full-body harness connected from
your back to a solid post or fence by a long bungee cord.
Stretch it to a firm position, then use your normal pitching wind-up
and release to pitch with resistance coming from the
bungee.
You can also purchase (or make) a bungee with a ball on the
end. Use it in a similar fashion to build pitching
arm/shoulder strength and speed.
15. Rapid-sequence
pitching drills – Sometimes we call these
"speed drills" which we do at the end of a practice session to build
both strength and stamina. (Incidentally, you need a
cooperative catcher to make these drills
work).
The
object is to throw 15 full speed pitches WITHOUT winding up, as
rapidly as possible. As soon as the catcher catches one, she
rapidly returns the ball to the pitcher who is already on the
rubber, ready to start her delivery again. It is best to
use two balls...so the catcher can already have one in her throwing
hand when she catches a pitch. If done rapidly, 15 pitches and
throwbacks will take 45 seconds to 1
minute.
Rest for 1 minute. Then do 15 rapid-sequence pitches
again.
Do at least 4 drills of 15 pitches each. Go at it until
you are exhausted,
then...
do
it one more time!
16. One Knee
drill – This drill is used for increasing upper body
strength and arm speed: Facing the catcher, kneel on your
pitching-side knee with the other knee bent at 90 degrees and
facing forward. Keep your body up straight. Throw at
least 30 full speed fastballs while on one knee. This exercise
can also help with speed development during a game…without a catcher
(but have someone help retrieve balls) from 4 or
5 feet away, practice throwing rapidly against a
fence.
17. The 9 O’clock One-Step
drill – This drill is designed to assist in
“closing” and using the lower body: Face 3rd base (for a
right-hander) start by holding the ball straight up in the air, and
glove hand pointing toward the catcher. Throw hard, and follow
through, ending up in the ready position.
18. Trunk (midsection) Stretching and Exercises
- Your belly and back muscles force the torqing (closing) of the hip to help drive the ball through at
the release. Many pitchers can show a definite increase in
speed by emphasizing trunk and cross-leg stretches prior to a
game.
19. Wrist-Snap
Exercises – A consistently good wrist snap at the
release point of your pitch can add to your speed. Do lots of
wrist exercises when warming-up…every
time!
a) From 12 to 15 feet,
throw to a catcher: Pitching arm straight down at your side,
throw only by snapping your
wrist.
b) Sitting:
Raise your left knee slightly. Push your right hand under the
knee. Throw the ball straight up…throwing it higher and with
more accuracy each time. Do 50 or more of these each
time.
c) Before practice, before a
game, or between innings, loosen your wrist. Keep it moving up and
down.
20. Throw at an old piece of
carpet or tarp – More than any other, this
exercise has consistently added more speed for most
pitchers who practice it. Since we are in an area where
outdoor pitching practice isn't always practical, we encourage
pitchers to find a heavy tarp or carpet remnant at least 6 feet
wide and 10 feet long, hang it from a joist in the basement or a
rafter in the garage, then just wail the ball at it with all of your
might. Don't worry about control, just throw hard. Use
your full wind-up and good pitching mechanics, but throw each pitch
as hard as you can...without worrying about accuracy. There's
no one to call balls and strikes, just think that each pitch needs
to be a little harder than the
last.
Read
more about this by clicking here: An Off-Season Drill
to Increase Speed
The
list above can be downloaded and printed from Microsoft Word

Do you want to reprint
this article or use it on your website or in your
newsletter?
As long as it is not for profit,
our only requirement is that you first notify us, then include the
following sentence:
Article by Gerald Warner of
PitchSoftball.com
and include a reference to this
website: www.pitchsoftball.com
If you have questions or
need more information
E-mail us, or call Pitching
Instructor Gerald Warner in Colorado at (720) 200-4575
Home Page | | About
Us | E-Mail
Us
Other
Articles for Experienced Pitchers | Beginning
Pitchers | 1st & 2nd Year
Pitchers | Coaches and
Parents |